If you’re a student looking for an email account, Gmail should be your first choice. It streamlines email communication and gives you all the tools you need to support your academic work. Whether it’s submitting assignments, staying in touch with teachers, connecting with family and friends, or signing up for educational resources, Gmail makes everything easier.
The best part? Setting up an account is quick and hassle-free. Just follow these steps to learn how to create Gmail account as a student in no time.
Step 1: Visit the Gmail Website
Start by opening your favorite web browser—preferably Google Chrome, since it works best with Google services. In the search bar, type “Gmail” and click the first result, or simply go straight to Gmail account sign up. This will take you to the Gmail homepage, where you can begin creating your new account.
Step 2: Click on “Create Account”
Once you land on the Gmail page, look for the “Create Account” button and click on it. A dropdown might ask if the account is for personal use, business, or a child. Choose “For myself.”
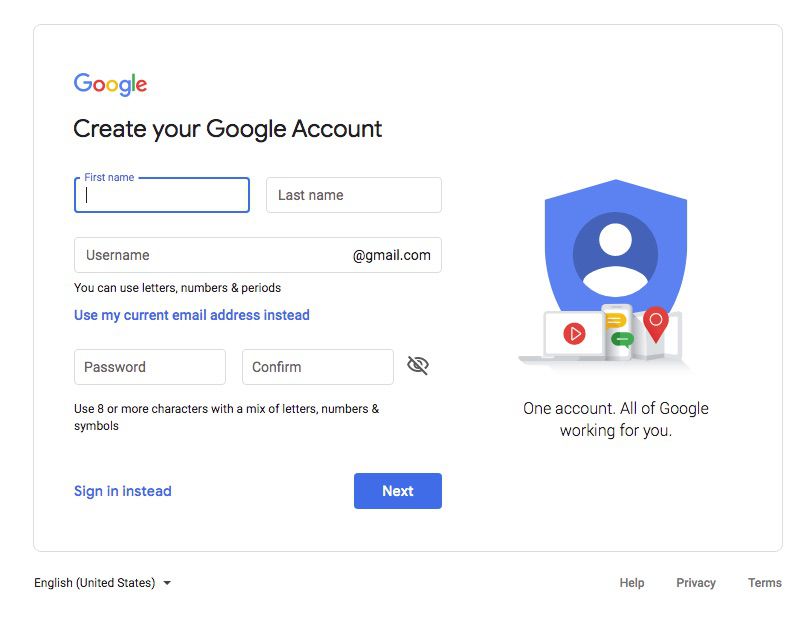
Step 3: Fill Out Your Information
You’ll now see a form where you need to enter your details:
- First and Last Name – Use your real name so teachers and classmates can recognize you easily.
- Email Address – Pick something professional and easy to remember (e.g., john.doe23@gmail.com instead of coolguy123@gmail.com).
- Password – Create a strong password using a combination of letters, numbers, and symbols. Store it in a safe place for future reference, and never share it with anyone.
Step 4: Verify Your Phone Number
To keep your account secure, Google requires a phone number for verification. Enter your number, and Google will send you a 6-digit code via text. Type in the code to continue. If you don’t have a phone for verification, ask your parents for assistance.
Step 5: Add Recovery Options (Optional but Recommended)
You’ll be asked to add a recovery email (another email you own), your date of birth, and gender. These details help recover your account if you ever forget your password. If you need help setting up a recovery email or phone number, talk to your parent or guardian, you may be allowed to use their email address for this purpose.
Step 6: Accept Google’s Terms & Conditions
Before moving forward, Google will show you its Terms of Service and Privacy Policy. These explain the rules for using your account and how your information is handled. It’s a good habit to glance through them so you know your rights and responsibilities as a user. When you’re ready, simply click “I Agree” to continue.
Step 7: Complete the Captcha
Sometimes, Google may ask you to complete a captcha to confirm that you’re not a robot. This is simply a short test to keep your account safe and prevent automated systems from creating fake accounts. The captcha may ask you to type in some letters or numbers, select pictures that match a description (like all images with traffic lights or buses), or check a small box that says “I’m not a robot.” Just follow the on-screen instructions carefully, and you’ll be done in a few seconds.
Step 8: Special Note for Students Under 13
If you’re under 13, Google requires parental permission to create an account. Your parent or guardian can use Google Family Link to set up and manage your Gmail account for safety. So if you fall in this category, let them help you to have your Gmail account set up. An remember if you are not allowed to browse the internet on your own, create your email account under supervision.
Step 9: Welcome to Gmail!
Congratulations! You’ve successfully created your Gmail account. Now you can send emails, join Google Classroom, and sign up for online student resources with ease. The first excitement comes when you want to announce to your friends about your new email account. You can now sign in and have the feeling of owning a Gmail account as a student.
Now you are in your inbox. Since your account is new, you will see one system email already there. As you start communicating with friends, family, and other contacts, your inbox will gradually fill up with more emails over time.
How to send your first email using your new Gmail account – find out from this post.

How Do We Conclude?
Having a Gmail account as a student gives you access to countless educational tools, from Google Docs to Google Drive. Plus, it keeps all your academic communication in one place. So don’t wait—follow these steps and get started today. If you have any challenges, let us know.
What’s Next After Creating Your Gmail Account?
The fact: Gmail has become more than just an email tool for students. Here is why?
When students create a Gmail account, it often feels like a simple requirement — something needed to sign up for school platforms or receive messages.
But once school activities begin, Gmail quietly becomes much more than that.
It starts with one email about an assignment deadline.
Then another about a test date.
Later, a group project update comes in.
Soon after, there’s a reminder about fees, registration, or timetable changes.
All of it arrives in one place: your Gmail inbox.
At first, students try to remember everything mentally. That works for a short while. But as messages increase, important emails get buried, deadlines feel unclear, and tasks begin to overlap.
This is where many students struggle — not because they are lazy or incapable, but because information keeps coming in without a clear system to manage it.
Students who handle this better usually do one thing differently: they treat Gmail as a signal system, not just an inbox.
An email means something needs attention.
A deadline means a plan is required.
A reminder means action must be scheduled.
To make that work, Gmail needs support — something that turns messages into clear goals and actions.
That’s why some students use a goal-setting and planning system alongside Gmail.
Instead of holding everything in their head, they:
- turn emails into specific academic goals
- break assignments into smaller, manageable steps
- track progress over days and weeks
- stay consistent without feeling overwhelmed
One tool students use for this purpose is GoalsOnTrack — a platform designed to help people set goals, plan tasks, and track progress in a structured way.
If you want a clearer, more organized way to manage school responsibilities after setting up Gmail, this is a practical next step to explore.
👉 Plan your academic goals and stay organized
Would you like to check how well you understood the entire Gmail account setup process? Try the Fun Quiz now.
Frequently Asked Questions (FAQ)
Why should I create a Gmail account as a student?
A Gmail account allows students to communicate with teachers and classmates, submit assignments, access Google Classroom, store files on Google Drive, and use other essential Google tools for education.
What do I need before creating a Gmail account?
You need an internet connection, a web browser, your personal details (name and date of birth), a strong password, and a phone number for verification.
How do I start creating a Gmail account?
Visit mail.google.com, click on Create account, and choose For myself to begin the registration process.
What information will Google ask me to provide?
Google will ask for your first and last name, preferred email address, password, phone number for verification, date of birth, and gender (optional).
Why does Google require a phone number?
The phone number is used to send a verification code and helps protect your account. It also makes account recovery easier if you forget your password.
Is a recovery email mandatory?
No, it is optional. However, adding a recovery email is strongly recommended to help you regain access if your account is ever locked or compromised.
Do I need to agree to Google’s terms?
Yes. You must review and accept Google’s Terms of Service and Privacy Policy before your Gmail account can be created.
What is a captcha and why do I see it?
A captcha is a simple verification step to confirm you are a real person. It helps prevent automated systems from creating fake accounts.
Can students under 13 create a Gmail account?
Yes, but parental consent is required. Parents usually set up and manage the account using Google Family Link.
What can I do after my Gmail account is created?
You can send and receive emails, join online classes, store assignments, collaborate on documents, and access all Google services linked to your account.